" height="18.016311920580208px" id="GKXyVanMq" stroke-dasharray="0" stroke-linecap="butt" stroke-linejoin="miter" stroke-miterlimit="10" stroke-width="0.5" stroke="rgb(0, 0, 0)" transform="translate(3 3)" width="18px"/></svg>)
"/><stop offset="1" stop-color="rgb(227, 224, 244)"/></linearGradient><linearGradient id="CBS1bzkxF-2031533640-linear-gradient" x1="0.49751243781094523" x2="0.5024875621890548" y1="0" y2="1"><stop offset="0" stop-color="rgb(255, 255, 255)"/><stop offset="1" stop-color="rgb(227, 224, 244)"/></linearGradient><linearGradient id="Jd7AK81w9-2031533640-linear-gradient" x1="0.49751243781094523" x2="0.5024875621890548" y1="0" y2="1"><stop offset="0" stop-color="rgb(255, 255, 255)"/><stop offset="1" stop-color="rgb(227, 224, 244)"/></linearGradient></defs><g d="M 0 16 L 0 0 L 16 0 L 16 16 Z M 9.167 5.167 C 9.167 4.891 8.943 4.667 8.667 4.667 C 8.391 4.667 8.167 4.891 8.167 5.167 C 8.167 6.784 7.809 7.834 7.155 8.488 C 6.501 9.143 5.451 9.5 3.833 9.5 C 3.557 9.5 3.333 9.724 3.333 10 C 3.333 10.276 3.557 10.5 3.833 10.5 C 5.451 10.5 6.501 10.857 7.155 11.512 C 7.809 12.166 8.167 13.216 8.167 14.833 C 8.167 15.109 8.391 15.333 8.667 15.333 C 8.943 15.333 9.167 15.109 9.167 14.833 C 9.167 13.216 9.524 12.166 10.178 11.512 C 10.832 10.857 11.883 10.5 13.5 10.5 C 13.776 10.5 14 10.276 14 10 C 14 9.724 13.776 9.5 13.5 9.5 C 11.883 9.5 10.832 9.143 10.178 8.488 C 9.524 7.834 9.167 6.784 9.167 5.167 Z M 4 3.667 C 4 3.483 3.851 3.333 3.667 3.333 C 3.483 3.333 3.333 3.483 3.333 3.667 C 3.333 4.32 3.189 4.715 2.952 4.952 C 2.715 5.189 2.32 5.333 1.667 5.333 C 1.483 5.333 1.333 5.483 1.333 5.667 C 1.333 5.851 1.483 6 1.667 6 C 2.32 6 2.715 6.145 2.952 6.382 C 3.189 6.618 3.333 7.013 3.333 7.667 C 3.333 7.851 3.483 8 3.667 8 C 3.851 8 4 7.851 4 7.667 C 4 7.013 4.145 6.618 4.382 6.382 C 4.618 6.145 5.013 6 5.667 6 C 5.851 6 6 5.851 6 5.667 C 6 5.483 5.851 5.333 5.667 5.333 C 5.013 5.333 4.618 5.189 4.382 4.952 C 4.145 4.715 4 4.32 4 3.667 Z M 7.333 1 C 7.333 0.816 7.184 0.667 7 0.667 C 6.816 0.667 6.667 0.816 6.667 1 C 6.667 1.422 6.573 1.65 6.445 1.778 C 6.317 1.906 6.089 2 5.667 2 C 5.483 2 5.333 2.149 5.333 2.333 C 5.333 2.517 5.483 2.667 5.667 2.667 C 6.089 2.667 6.317 2.761 6.445 2.889 C 6.573 3.016 6.667 3.244 6.667 3.667 C 6.667 3.851 6.816 4 7 4 C 7.184 4 7.333 3.851 7.333 3.667 C 7.333 3.244 7.427 3.016 7.555 2.889 C 7.683 2.761 7.911 2.667 8.333 2.667 C 8.517 2.667 8.667 2.517 8.667 2.333 C 8.667 2.149 8.517 2 8.333 2 C 7.911 2 7.683 1.906 7.555 1.778 C 7.427 1.65 7.333 1.422 7.333 1 Z" fill="transparent" height="16px" id="aoZYv33vR" width="16px"><path d="M 0 16 L 0 0 L 16 0 L 16 16 Z" fill="transparent" height="16px" id="Z2uGmhW9f" width="16px"/><g d="M 7.833 4.5 C 7.833 4.224 7.609 4 7.333 4 C 7.057 4 6.833 4.224 6.833 4.5 C 6.833 6.117 6.476 7.168 5.822 7.822 C 5.168 8.476 4.117 8.833 2.5 8.833 C 2.224 8.833 2 9.057 2 9.333 C 2 9.61 2.224 9.833 2.5 9.833 C 4.117 9.833 5.168 10.191 5.822 10.845 C 6.476 11.499 6.833 12.549 6.833 14.167 C 6.833 14.443 7.057 14.667 7.333 14.667 C 7.609 14.667 7.833 14.443 7.833 14.167 C 7.833 12.549 8.191 11.499 8.845 10.845 C 9.499 10.191 10.549 9.833 12.167 9.833 C 12.443 9.833 12.667 9.61 12.667 9.333 C 12.667 9.057 12.443 8.833 12.167 8.833 C 10.549 8.833 9.499 8.476 8.845 7.822 C 8.191 7.168 7.833 6.117 7.833 4.5 Z M 2.667 3 C 2.667 2.816 2.517 2.667 2.333 2.667 C 2.149 2.667 2 2.816 2 3 C 2 3.654 1.855 4.048 1.618 4.285 C 1.382 4.522 0.987 4.667 0.333 4.667 C 0.149 4.667 0 4.816 0 5 C 0 5.184 0.149 5.333 0.333 5.333 C 0.987 5.333 1.382 5.478 1.618 5.715 C 1.855 5.952 2 6.346 2 7 C 2 7.184 2.149 7.333 2.333 7.333 C 2.517 7.333 2.667 7.184 2.667 7 C 2.667 6.346 2.811 5.952 3.048 5.715 C 3.285 5.478 3.68 5.333 4.333 5.333 C 4.517 5.333 4.667 5.184 4.667 5 C 4.667 4.816 4.517 4.667 4.333 4.667 C 3.68 4.667 3.285 4.522 3.048 4.285 C 2.811 4.048 2.667 3.654 2.667 3 Z M 6 0.333 C 6 0.149 5.851 0 5.667 0 C 5.483 0 5.333 0.149 5.333 0.333 C 5.333 0.756 5.239 0.984 5.112 1.112 C 4.984 1.239 4.756 1.333 4.333 1.333 C 4.149 1.333 4 1.483 4 1.667 C 4 1.851 4.149 2 4.333 2 C 4.756 2 4.984 2.094 5.112 2.222 C 5.239 2.35 5.333 2.578 5.333 3 C 5.333 3.184 5.483 3.333 5.667 3.333 C 5.851 3.333 6 3.184 6 3 C 6 2.578 6.094 2.35 6.222 2.222 C 6.35 2.094 6.578 2 7 2 C 7.184 2 7.333 1.851 7.333 1.667 C 7.333 1.483 7.184 1.333 7 1.333 C 6.578 1.333 6.35 1.239 6.222 1.112 C 6.094 0.984 6 0.756 6 0.333 Z" fill="transparent" height="14.66671286102295px" id="ae6ccdFme" transform="translate(1.333 0.667)" width="12.66663px"><path d="M 5.833 0.5 C 5.833 0.224 5.609 0 5.333 0 C 5.057 0 4.833 0.224 4.833 0.5 C 4.833 2.117 4.476 3.168 3.822 3.822 C 3.168 4.476 2.117 4.833 0.5 4.833 C 0.224 4.833 0 5.057 0 5.333 C 0 5.61 0.224 5.833 0.5 5.833 C 2.117 5.833 3.168 6.191 3.822 6.845 C 4.476 7.499 4.833 8.549 4.833 10.167 C 4.833 10.443 5.057 10.667 5.333 10.667 C 5.609 10.667 5.833 10.443 5.833 10.167 C 5.833 8.549 6.191 7.499 6.845 6.845 C 7.499 6.191 8.549 5.833 10.167 5.833 C 10.443 5.833 10.667 5.61 10.667 5.333 C 10.667 5.057 10.443 4.833 10.167 4.833 C 8.549 4.833 7.499 4.476 6.845 3.822 C 6.191 3.168 5.833 2.117 5.833 0.5 Z" fill="url(%23t2lXByE48-2031533640-linear-gradient)" height="10.66671px" id="t2lXByE48" transform="translate(2 4)" width="10.66663px"/><path d="M 2.667 0.333 C 2.667 0.149 2.517 0 2.333 0 C 2.149 0 2 0.149 2 0.333 C 2 0.987 1.855 1.382 1.618 1.618 C 1.382 1.855 0.987 2 0.333 2 C 0.149 2 0 2.149 0 2.333 C 0 2.517 0.149 2.667 0.333 2.667 C 0.987 2.667 1.382 2.811 1.618 3.048 C 1.855 3.285 2 3.68 2 4.333 C 2 4.517 2.149 4.667 2.333 4.667 C 2.517 4.667 2.667 4.517 2.667 4.333 C 2.667 3.68 2.811 3.285 3.048 3.048 C 3.285 2.811 3.68 2.667 4.333 2.667 C 4.517 2.667 4.667 2.517 4.667 2.333 C 4.667 2.149 4.517 2 4.333 2 C 3.68 2 3.285 1.855 3.048 1.618 C 2.811 1.382 2.667 0.987 2.667 0.333 Z" fill="url(%23CBS1bzkxF-2031533640-linear-gradient)" height="4.66667px" id="CBS1bzkxF" transform="translate(0 2.667)" width="4.66667px"/><path d="M 2 0.333 C 2 0.149 1.851 0 1.667 0 C 1.483 0 1.333 0.149 1.333 0.333 C 1.333 0.756 1.239 0.984 1.112 1.112 C 0.984 1.239 0.756 1.333 0.333 1.333 C 0.149 1.333 0 1.483 0 1.667 C 0 1.851 0.149 2 0.333 2 C 0.756 2 0.984 2.094 1.112 2.222 C 1.239 2.35 1.333 2.578 1.333 3 C 1.333 3.184 1.483 3.333 1.667 3.333 C 1.851 3.333 2 3.184 2 3 C 2 2.578 2.094 2.35 2.222 2.222 C 2.35 2.094 2.578 2 3 2 C 3.184 2 3.333 1.851 3.333 1.667 C 3.333 1.483 3.184 1.333 3 1.333 C 2.578 1.333 2.35 1.239 2.222 1.112 C 2.094 0.984 2 0.756 2 0.333 Z" fill="url(%23Jd7AK81w9-2031533640-linear-gradient)" height="3.333333px" id="Jd7AK81w9" transform="translate(4 0)" width="3.3333399999999997px"/></g></g></svg>)
" height="24px" id="WCm44spAV" width="24px"/><path d="M 3.892 7.742 C 1.674 7.742 0 6.014 0 3.882 C 0 1.738 1.589 0 3.892 0 C 5.107 0 5.951 0.374 6.623 1.173 L 5.566 2.09 C 5.118 1.621 4.564 1.386 3.892 1.386 C 2.452 1.386 1.547 2.517 1.547 3.882 C 1.547 5.246 2.452 6.356 3.924 6.356 C 4.649 6.356 5.193 6.111 5.63 5.63 L 6.718 6.558 C 6.153 7.24 5.193 7.742 3.892 7.742 Z" fill="rgb(255, 255, 255)" height="7.741500000000002px" id="XEPpGD7l5" transform="translate(4 8.25)" width="6.717999999999989px"/><path d="M 2.74 7.922 C 1.215 7.922 0 6.632 0 5.032 C 0 3.433 1.215 2.122 2.74 2.122 C 3.7 2.122 4.201 2.516 4.5 3.113 L 4.5 2.239 L 5.928 2.239 L 5.928 7.784 L 4.531 7.784 L 4.531 6.877 C 4.233 7.507 3.731 7.922 2.74 7.922 Z M 1.439 5.023 C 1.439 5.865 2.057 6.622 2.975 6.622 C 3.924 6.622 4.531 5.897 4.531 5.033 C 4.531 4.169 3.924 3.423 2.975 3.423 C 2.057 3.423 1.439 4.159 1.439 5.022 Z M 6.784 7.784 L 6.784 0 L 8.224 0 L 8.224 7.784 L 6.784 7.784 Z" fill="rgb(255, 255, 255)" height="7.9224997406005855px" id="lGDJupIUR" transform="translate(10.5 8)" width="8.223500194549558px"/></g></svg>)
" width="18px"><path d="M 2 8 C 0.895 8 0 7.105 0 6 L 0 2 C 0 0.895 0.895 0 2 0 L 6 0 C 7.105 0 8 0.895 8 2 L 8 6 C 8 7.105 7.105 8 6 8 Z" fill="transparent" height="8px" id="ZrCrI93dV" stroke-dasharray="" stroke-linecap="round" stroke-linejoin="round" stroke-width="2" stroke="rgb(0, 0, 0)" width="8px"/><path d="M 0 0 L 0 4 C 0 5.105 0.895 6 2 6 L 6 6" fill="transparent" height="6px" id="emltWYAiE" stroke-dasharray="" stroke-linecap="round" stroke-linejoin="round" stroke-width="2" stroke="rgb(0, 0, 0)" transform="translate(4 8)" width="6px"/><path d="M 2 8 C 0.895 8 0 7.105 0 6 L 0 2 C 0 0.895 0.895 0 2 0 L 6 0 C 7.105 0 8 0.895 8 2 L 8 6 C 8 7.105 7.105 8 6 8 Z" fill="transparent" height="8px" id="WpBecYDfi" stroke-dasharray="" stroke-linecap="round" stroke-linejoin="round" stroke-width="2" stroke="rgb(0, 0, 0)" transform="translate(10 10)" width="8px"/></g></svg>)
By

Susan Moeller
How to Connect Riverside to Cal.com (and Set It as Your Default Conferencing App)
Explore how teams and creators use Cal.com to automate workflows, connect their favorite tools, and turn simple bookings into fully integrated experiences—from video recording with Riverside to payments, routing, and more.

If you are using Riverside video for podcasts, interviews, or content creation, one of the easiest ways to upgrade your workflow is to connect it directly to Cal.com.
Instead of manually creating sessions and sending links, you can automate everything so every booking instantly becomes a ready-to-go Riverside hosting session.
Here is exactly how to set it up.
Step 1: Install the Riverside Conferencing App from the Cal.com App Store
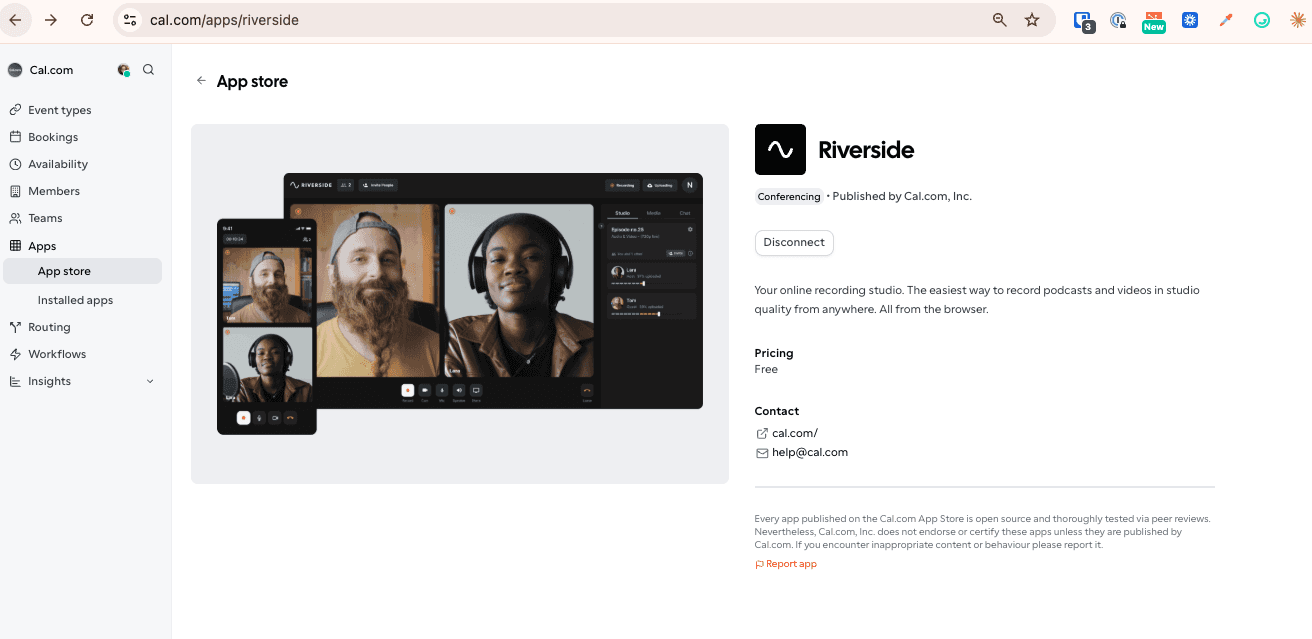
Start inside your Cal.com dashboard
Go to the App Store
Search for Riverside
Click Install
Connect your Riverside account
Once installed, Riverside becomes available as a conferencing option across your scheduling setup.
Why this matters
The Cal.com App Store makes this seamless. Instead of forcing a fixed setup, you can install tools like Riverside as needed. This turns your scheduler into a flexible and modular workflow engine.
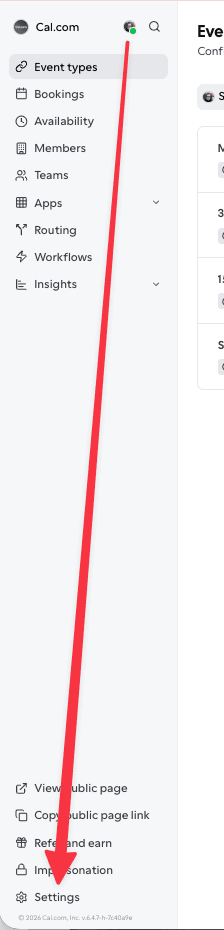
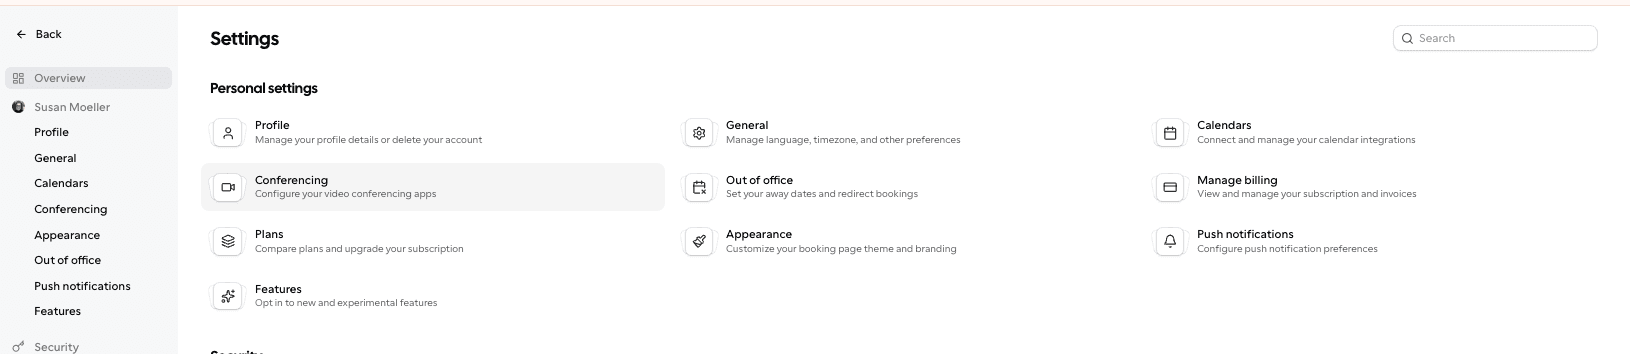
Step 2: Set Riverside as Your Default Conferencing App
To make Riverside your default for all bookings:
Go to Settings → Conferencing
Locate Riverside video
Set it as your default conferencing app
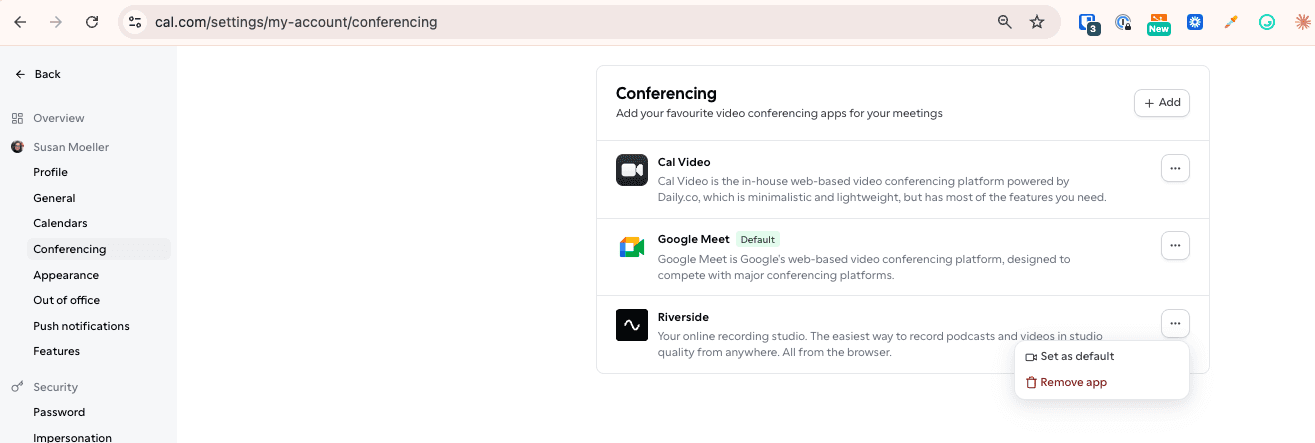
Now every new event you create will automatically use Riverside.
What this does
You are standardizing your workflow. Whether it is a podcast, interview, or recording session, everything runs through your Riverside hosting setup without needing to configure it each time.
Step 3: Use Riverside for Specific Event Types
If you want Riverside only for certain workflows such as recordings:
Go to Event Types
Select or create an event
Scroll to Location / Conferencing
Choose Riverside
Now, when someone books:
A Riverside session is automatically created
The correct Riverside video link is added to the invite
Your guest joins the right recording environment instantly
What Your Workflow Looks Like Now
Before:
Book meeting
Set up Riverside session manually
Send link separately
Hope everything lines up
After:
Guest books via Cal.com
A Riverside hosting session is automatically generated
Link is included in confirmation and calendar
You join and start recording
No duplication. No confusion.
Why This Setup Works So Well
Riverside is built for high-quality remote recording.
Cal.com is built for flexible scheduling.
Together, they create a single and streamlined workflow where:
Booking triggers session creation
Your conferencing app Riverside video handles recording automatically
Guests have a smooth and professional experience
The Role of the Cal.com App Store
The reason this integration works so well comes down to the App Store.
Instead of locking you into a single setup, Cal.com lets you:
Install Riverside as your conferencing layer
Combine it with other tools such as payments, automation, and CRM
Customize workflows for different use cases
It allows you to turn simple scheduling into a fully integrated system.
Final Thoughts
Connecting Riverside to Cal.com takes just a few minutes, but it completely upgrades how you manage recordings.
With Riverside video as your default conferencing app:
Every booking becomes a ready-to-record session
Your Riverside hosting workflow runs automatically
You spend less time setting up and more time creating

Get started with Cal.com for free today!
Experience seamless scheduling and productivity with no hidden fees. Sign up in seconds and start simplifying your scheduling today, no credit card required!


